The aim of this guide is to help with switching to rendering on GPU with V-Ray and has all the basic information needed to better understand advantages and limitations of this approach. Everything below this point is based on our experience with using V-Ray GPU (RT) as our main production renderer.
1. Why GPU for rendering?
It all started around 18 months ago when we decided to do a hardware upgrade to get better 3ds Max viewport performance. So we installed new GPUs (it was GTX970 4GB) and decided to see how things improved with rendering on GPU with V-Ray RT. We loved it!… Well, to be honest not straight away. It took time to change the mindset, but the speed boost and interactivity were there to help and sooth any pain caused by some V-Ray Adv features missing.
It wasn’t the first time I tried rendering on graphic cards. But back when GPUs had 512-1024 MB of memory it wasn’t really a production ready solution (at least for us). It changed with launch of Nvidia’s maxwell cards that came with 4GB on board, did cost fraction of their Quadro brothers and were much faster and more energy-efficient than earlier generation. This alone made it possible to render 70-80% of our scenes.

2. Why V-Ray engine?
We’ve chosen V-Ray RT as our main rendering engine at the end, but It took us some time be convinced. One thing that I feel is a bit unfortunate is that for a very long time I did understand it’s true potential. I thought it’s just ‘real time’ addition to V-Ray Adv. At earlier stages there were some differences in renders from RT and ADV due to many missing features, but that changed a lot over time due to fast development. I’m extremely happy that Chaos Group didn’t dismiss GPU rendering as being ‘too hard’ and pushed hard with development. And I believe that now it’s the best time to start using it in production.
Looking at V-Ray RT as a completely different engine is the key to loving it. You need to go full throttle with it. Shade, light, render previews, finals with RT. Going back and forth to CPU (Adv) is not the best idea in the same way that jumping between Corona, Octane and V-Ray in the middle of production isn’t. That said, you can still use it for lighting preview and shading, but you have to expect that some features will be missing or may work in a different way.
Currently RT is at fully production ready state and to me it has proven to be best way to create amazing renders.
3. What kind of hardware do you need ?
At this stage I recommend CUDA devices. V-Ray supports OpenCL, but I find that CUDA GPUs offer better performance for the same money. Here is a list of the worthy ones:
Pascal (current) Generation:
- Nvidia GTX 1070 8GB – Probably the best choice at the moment if you don’t need 12 GB of memory. (We have those for our workstations on top of 970s for viewport)
- Nvidia GTX 1080 8GB – Slightly faster, 50% more expensive than 1070.
- Nvidia Titan X 12GB (Pascal) – If you have money go for it or wait for GTX 1080Ti rumored to come out with 12GB on board and may be just slightly slower.
Maxwel (previous) Generation:
- Nvidia GTX 970 4GB – Cheap, great performance, enough memory for starting out.
- Nvidia GTX 980 4GB – A bit more expensive, great performance.
- Nvidia GTX 980ti 6GB – Best buy for the performance / memory / price ratio in Maxwell family.
- Nvidia Titan X 12GB (Maxwell) – Slightly faster than 980Ti, double the memory. Great for production as it can handle very big scenes.
If you wish to upgrade, don’t sell or throw away your old GPU. Keep it for using it with your monitor(s) and add another GPU device for rendering. This makes working with viewport and rendering much smoother. If you wish to build real rendering monster check out this post: Building 4xGPU rack-mount rendering node

4. Rendering settings.
Overall V-Ray RT has the best kind of settings, there aren’t many of them and in many cases there’s no point in changing defaults. Personally I love playing with settings (and breaking things), but as supervisor and artist I believe that they shouldn’t get in the way of creation. Defaults are the fastest in most cases so just hit render and focus on the creation. Individual subdivision settings for lights, materials don’t matter, they won’t speed up or slow rendering so don’t waste your time playing with them. Just do nice pictures !
If you’re starting out with V-Ray RT there are 3 main settings to consider:
- Engine type: Set this to CUDA
- Max. noise. Default is 0.005. This is your main quality setting. Higher value = more noise, faster render. Lower value = less noise, slower render. V-Ray RT supports adaptive rendering and does it great. With new sampling it will produce very consistent noise over whole image. For animation you can go as high as 0.025-0.03 and it still will look very good. If you use denoiser you could potentially go as high as 0.06-0.08 and it will hold up.
- If you use the same GPU for monitor and rendering it will feel sluggish, the best way is to add second GPU only for rendering but if that’s not possible, you can set Rays Per Pixel to 1-2. This will force V-Ray to use GPU in less consuming way and will improve responsiveness. In SP5 of RT there is low priority mode as well, but both solutions will make rendering significantly slower.
I created small script lately that resets all the settings and sets up RT as production and active shade renderer. You can grab it here: ( https://www.dabarti.com/screens/Reset_settings_and_setup_RT.ms ). Drag and drop it to 3ds max or use it as startup script. I usually use it to reset all settings after opening some old V-Ray Adv scene.

5. Memory management.
With GPUs the main limitation is memory, so until we see GPUs with unlimited memory you have to be careful. But it’s not as bad as it may seem, especially with 8-12GB on board. You can render very heavy scenes if you work in a clever way.
Always use the latest version of RT as it’s constantly evolving, getting better and faster. For example newest version (currently upcoming SP5) has very good texture memory management. As opposed to older builds it can dynamically adjust the size of the texture depending on how small it is in the render.
Few things you should consider to save memory:
- Don’t over-subdivide your geometry. If the object is quite small there is no point of subdividing it 2-3 times if once is enough.
- Use instancing where you can. Adding another instance of the geometry is basically free.
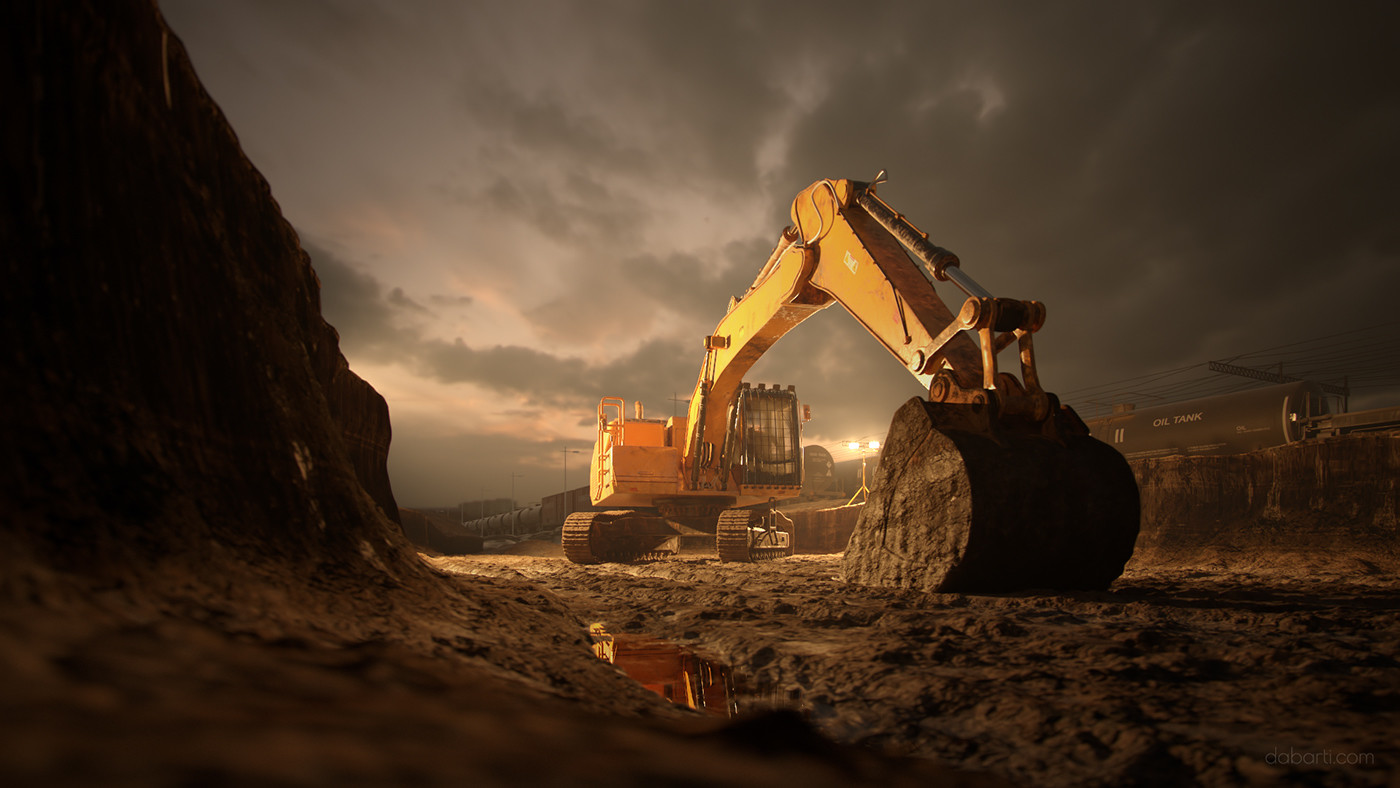
- Use smaller tiled textures if possible. Instead of creating 4k, 8k texture for diffuse, glossiness, bump try out mixing smaller maps together. For excavator scene we used many small maps tiled 10-20 times and mixed them together with masks for rust, dust, dirt in V-Ray Blend material. Use mix, color correction and composite maps to reuse as much textures as you can, they work work well in V-Ray GPU.
- Work with RT in mind. Check memory usage often to better understand how much space models / shaders / textures are taking. You can do that with tools like GPU-Z or MSI afterburner or natively in V-Ray log or Statistics. Log will output how much memory is taken by shaders / textures, geometry and other things and newer versions of RT output also how much VRAM is left. If you will run out of memory V-Ray log will let you know
- Knowing how to build leaner models and shaders will be useful not only in GPU rendering. The same principles apply in Adv CPU or other renderers. Learn this and ultimately you will be able to build bigger and more detailed scenes. And with speed advantage you will be able to try out much more options and ultimately get better looking images.
6. Shading and lighting.
Interactivity is the king! Fire up Active Shade (interactive) mode and all changes to your scene will be transferred to RT and rendered straight away. There is little to none delay and this allows quick look development as in matter of minutes you can try tens of different light or shading options. Remember: V-Ray GPU (RT) and V-Ray CPU (Adv) share a lot in common but they are different render engines. Things may look a bit different if you try to render final on CPU… So just render it on GPU and it will be faster.
Some shaders and maps don’t work on the GPU at the moment, but the number of those is getting smaller over time. When in doubt check this page: https://docs.chaosgroup.com/display/VRAY3MAX/V-Ray+RT+Supported+Features
For interactive lighting setup check out my tool called “Light Assistant”: https://dabarti.com/vfx/dabarti-light-assistant/

7. Rendering animations.
It just work. With GPU you can get a lot more frames finished faster than on CPU. And if you go ahead and get as close to final look as possible straight from the render it will also speed up overall workflow. If there are any bugs to geometry or animation you will have more time for revisions.
Also if you plan to build render-farm it’s also cost efficient. Less space, less nodes, less licences to buy, better computing power/Watt.
Dabarti is small team, but after switching to RT we were able to output so many shots that we had to start using Shotgun and Deadline in order to keep track of it all. But this is good.
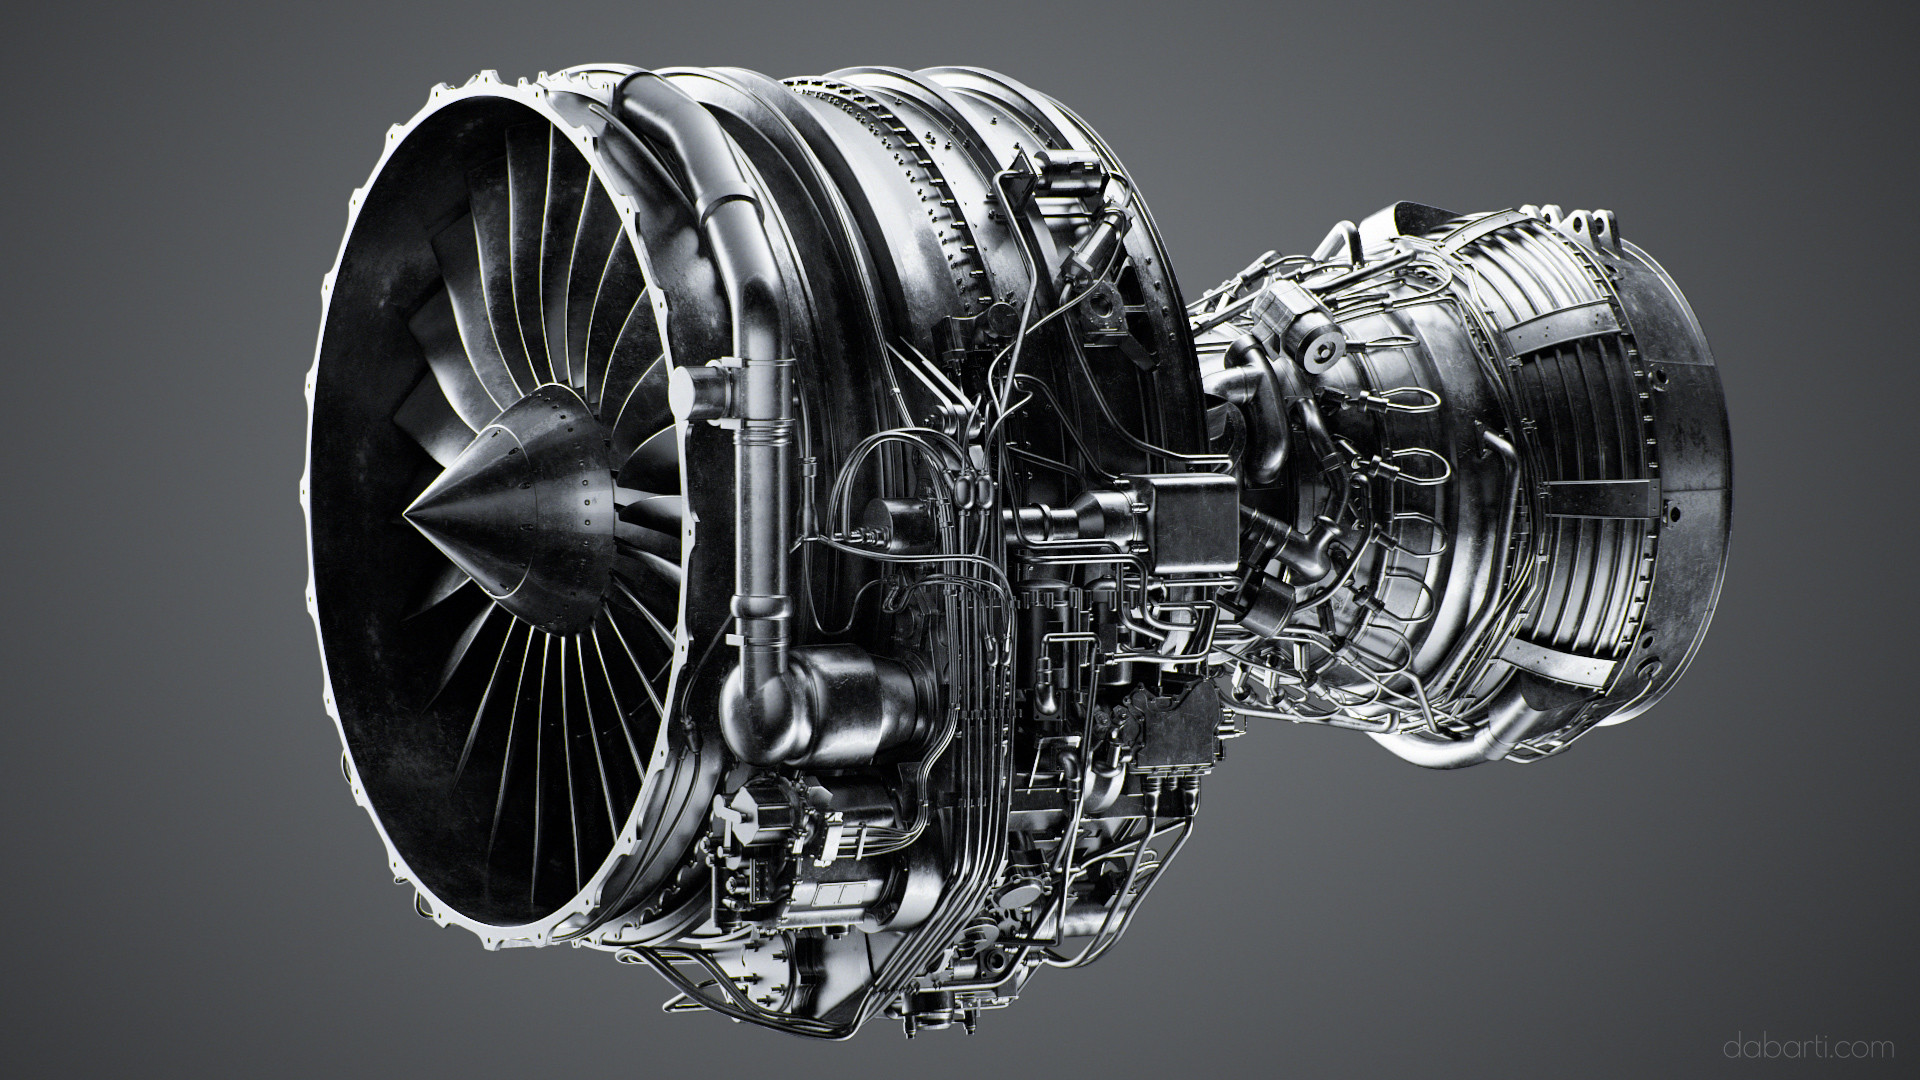
Check out some of the shots we were able to complete with it:
All images used for this post were rendered at Dabarti with V-Ray GPU (RT).
https://www.behance.net/Dabarti
https://www.instagram.com/dabarti_cgi/
https://www.facebook.com/DabartiCGI/
If there is something that you would like to know about rendering on GPU from the perspective of the artist ask in comments or through Facebook.
If you have a problem or a bug reports related to V-Ray RT, ask Chaos Group support via email or forums, they are there to help. By reporting bugs you actually help making the product better.


Hi! how you manage in Vray GPU 5 the differences between IPR and final mode?
how can i enable skyportle in vray lights and change sub division of lights and matrial in vraynext gpu..
Hi,
Very interesting. Thank you.
I want to ask you about efficiency of GPU workflow to make faster renderings. Does the only solution is to put noise to 0.03 and more? Or using less textures with smaller sizes and UV tiling can speed also rendering?… Does Specular, opacity etc in materials makes the rendering slower? Does Number of objects in the scene and number of polygons play a role in slowing rendering? .. Well my question is “what are all things to consider if we want to speed up rendering in vray rt gpu? ”
Do you use vraydenoiser filter for animation in each frame ? Or there is some other software where you can denoise a full sequence?
Thank you
What about the setup of the Vray RT render server? Currently I have multiple machines with cards and wondering if you can just network all those cards from different PCs? I’ve tried finding tutorials on this and it’s been hard to find. I fiddled with it one time and wasn’t sure exactly what needed to be launched for my workstation to grab the other PC cards.. it’s not that real time feedback like when you use backburner with Vray Adv. So.. I have 4 workstations.. 1 has two 1080 TI (12gb) cards, another has two 1080’s (8gb), another one 1080 (8gb) and the last one has a 1060 (6gb).. I have them networked for CPU rendering, but wasn’t certain how to do that with GPU.
It should be very similar, just start vrayspawner for RT (for 2017 it’s found inside C:\Program Files\Chaos Group\V-Ray\RT for 3ds Max 2017 for x64\bin for example) and use that station IP address for Distributed rendering.
I don’t use that very often though as network speed is limiting factor so I just prefer to make separate stations working on separate frames and save those at the end to network drive. Currently using Deadline for managing it.
Interesting.. now that would require you to have a license per workstation. I currently have 2 workstation licenses for now.. but that will change soon when my subscription plan starts.. going to go back to 1 license. Also only have 1 workstation license of Vray.. 7 rendering node licenses. Not sure if that has any effect when network rendering with GPU or not. Regardless, you say vrayspawner for RT. So what is the deal with the Vray RT Render Server? I pictured that a lot like the server you launch for each max machine.. but not 100% sure.
Hi, plz tell me
which rig is better for rt render
1080ti vs 2x 1070ti
Hi Tomasz,
I am currently testing vray RT and I am really glad to found your site. Great work and good advice here! I have some problems while rendering animations with vray RT. When i have some modifiers on my objects it appears that when i am rendering the animation with vray rt the animation will not render correct of the object with the animated modifier. It seems like the animation of the modifier is completly ignored while rendering in vray RT. I have the same problem with linked objects to animated objects. The result is different animated keyframes throughout the whole timeline. Are you familiar with this problem? Thank you in advance. Keep up the good works!
Best,
Sacha
I agree completely with Sachs. Very nice info. I like Sacha have had the exact same render problem with modifiers, skinning etc. But I think I have found the solution for that. 🙂 Still testing – before bragging to much.
HI Tomasz,
what is your strategy for animations and RT? All Brute Force? Or are you computing a flythrough LightCache? -If Lc are you comuting it in the Regular Vray production renderer?
Thanks,
Michael
Hi,
If it’s not interior, we use BF+BF, if it’s interior we use BF+LC. Just like that, no flythrough though, since we almost always have moving objects in the shots.
Best,
Hi Tomasz, great article! Thanks for sharing. Would you suggest overclocking GTX1070 and would that be safe? Thanks.
Great information here!! Really nicely explain! May I ask, how do you setup one card for UI and GTX 1070 for GPU rendering? Thank you
Just plug in your screens to the one used for UI/viewport and nothing to the one used for rendering.
I got a EVGA GTX 1070 and overclocked it with Precision X OC from them.
Power Target: 112%
Temp Target: 92°C
GPU Clock Offset: +200 MHz
Mem Clock Offset: +200 MHz
It works great!
Hey, can someone help me out here? I am experiencing this issue from VrayRT wherein i am seeing blue colors behind my VrayMtl with Opacity (I am creating a mesh back chair btw). I find it really weird as I switched in Vray Adv and everything else is perfectly fine.
Hi, It’s hard for me to judge exactly what’s the issue. Best is usually with this kind of problems to ask at Chaos Group support forums.
Also remember that V-Ray RT and V-Ray Adv always will look differently. Those are basically 2 different renderers and some things should be done a little bit differently.
I am looking into Razer Blades. Would a GTX 1060 render faster than a 970m? It has the same memory and amount of CUDA cores but out-performs it in other areas.
Hard to say. I would go with 1070 if possible, but 1060 should be similar to 970m.
I am looking into Razer Blades. Would a GTX 1060 work better than a 970m? They seem to have the same memory and amount of CUDA cores, but the 1060 out-performs it in other areas.
Hi Tomasz,
Thanks for your reply to my previous question. I’m loving the Vray 3.5 update, CUDA rendering seems to have gotten quite a lot faster! plus the new features def come in handy.
I was wondering if you’ve encountered any issues with flickering when rendering animation on GPU? – with camera and objects both moving in the scene. I’ve read this is a common issue when using Light cache – at present I’m using Brute Force for Primary GI and Light Cache for secondary. The problem is you don’t have many other options for GI when rendering on GPU – brute force + brute force seems to fix it but this takes roughly 3x as long to render my scenes. I like the speed that light cache provides, just not the flicker 🙂
Hi,
The only time I use BF+LC is for interiors and when I do that, I set it up to have higher subdivisions like 2000-2500 than there should be no flickering issue. In other scenes, exteriors, studio shots it’s rarely needed to use LC, as actually BF+BF will be faster when there is not that many secondary GI bounces.
Best,
Hi Tomasz,
In the supported fetaures I see partial support for 2sided mat and no for translucency so I how did you managed with that I see lots of things from the production on the website that look liked they used translucency?
Thanks
Hi Nik,
Translucency inside 2-sided is supported. The one found in VRayMtl isn’t, but you can kind of fake it with blending it with VRayFastSSS2.
Best,
Tomasz
i am planning to buy an alienware 15 r3 with gtx 1070 8gb but i have read vray crashes over it during rendering. have you faced any problem as such till now ?
I use 1070 daily, and it works perfectly.
Great read,
One thing I cant seem to find information on is what the difference between active shade and and production rendering is when using RT.
I know active shade is ‘real time’ rendering, but is there any speed differences? Also in active shade I seem to get issues with memory which im sure can be rectified with a bigger GPU.
When it comes to RT, when it’s used as Active Shade renderer it means that it’s in interactive mode. When it’s used as production renderer it will basically render the final frame without ability to change anything while it’s doing that. Just like any other renderer.
Also some settings are unavailable for Active shade, mainly those that will affect interactivity, for example lightcache doesn’t work.
Some of those things will probably change in future V-Ray releases, mainly due to introduction of IPR rendering in 3.5 for CPU side of V-Ray. Most likely there will be no need to use Active Shade at all in order to get interactive mode for RT GPU as well.
Hey amazing guide
I have one question I understand the max noise, but I can’t figure out the max paths/pixel numbers I’ve gone up and down but don’t understand how it works, when u set the max noise it keeps renderings past say 0.005 and continues for ages til it reaches path? Can u explain how that works?
Hi Louie,
Max paths/pixel is basically that… Maximum rays it can trace per each pixel. Most pixel won’t need that many rays/samples to reach target noise threshold, but there will be few that may need all of them. You can check that by using Render Element called Sample Rate.
Also keep in mind that when you see log message “Final noise set to:” and your final noise it doesn’t mean that all of pixels are noise-free, it just means that adaptive sampler set target to the final noise target, and most likely there is percentage of pixels left to clean up.
This may be confusing, but let me explain it a little bit more. The way adaptive sampling works is that it lowers noise constantly until reaching the target. When you will observe Sample Rate pass you will understand it a bit more. So you will see noise threshold going from for example 0.1… through 0.04 etc. down to your target 0.005. It’s done this way ensure that whenever you stop your rendering you will have evenly noise-free picture. But after reaching the Final noise level it will go ahead and try to use up remaining samples from the max paths/pixel to clean up image to the target threshold.
Hope this explanation isn’t too confusing.
Hey Tomasz, Thanks for the great writeup, it’s very helpful. I’m currently using V-Ray CUDA for Maya on an animation project – At the moment using 2x 980tis, hoping to get two more eventually. So far I’m finding its great for lookdev and shading etc, the interactivity is a massive time saver. However I still find I have quite long render times for final images if I’m trying to hit a noise threshold of 0.010. Like between 15-30 minutes depending on the scene (resolution 1080p).
Is this to be expected? And will I only get this lower by using more GPUs?
I’m also hoping to utilize the denoiser for my image sequences if possible. I noticed your script for denoising sequences in another post, what kind of noise threshold do you need to aim for to use this effectively?
Hi Greg, I guess render time depends a lot on the conditions. Interiors with many lights can render relatively long… Performance with many lights in RT was not the most effective until the lately introduced “Adaptive Lights” in Nightly Beta and it seems like it will helps a lot. I will try to post some test results once I’ll have spare time.
I usually render at 0.03-0.04 and denoise the results. Either with Neatvideo or vraydenoiser.
very helpfull, I’m thinking in upgrade my hardware focus in gpu rendering. You have to check Fstorm could be help with your production, and will be apreciate share your impressions since you haver experience with this technologies focus in animation.
Thanks again.
Hi David. I do test other engines from time to time. FStorm is solid one, it feels like better version of Octane. It has solid noise level based adaptive sampling, similar to what V-Ray had for long time. For some time it sampled lights better than V-Ray RT (if you don’t boost your render with Light Cache), but this will change with introduction of Adaptive Lights in 3.5, which I already test drove and it looks very promising. Other than that it has quite a bit of features missing due to it’s young age, but it might be solid engine for years if it won’t get into troubles with growing complexity that might slow it down.
As for V-Ray GPU, I think it’s just more stable, has better feature set and you basically get 2 rendering engines for the price of one. Rendering engines that are field tested.
I will continue using V-Ray RT GPU and help guys at Chaosgroup with testing and providing meaningful feedback as they are improving things constantly. I believe that what I do not only helps us at Dabarti, but it also might help other users in not having to deal with issues we stumble upon and report. And we aren’t gentle with it.
For the computer set up you have that uses a GTX 1070 8 GB card for the GPU and a GTX 970 to drive the viewport, what PSU are you using? Do you have the other specs for this build? I’d like to take a tower I have with a 970 in it and turn it into an RT build so any information you have re. hardware would be greatly appreciated. Thanks also for the write up, I’m convinced to give it a shot for my company’s production workflow.
I’m not sure about exact model, but those were 850W good quality PSU. Check this calculator that can help you with estimating your power needs – http://outervision.com/power-supply-calculator . Specs for workstations vary, it’s mix of 3-5 year old quad core desktop i7s, that were upgraded to 32GB of memory, SSD drives and new GPUs. Those changes basically gave them second life with minimal cost.
Best,
Tomasz
Hey Tomasz,
Nice review. Actually im trying the GPU world but i have always a problem that i never fixed. In the autoiluminated materials in Vray, i get always a really beast aliasing, how do you deal with that without losing details of the textures?
Thanks!
I guess this issue is mostly due to high difference in brightness. I usually use some form of tone mapping to bring the highlights down. If you reduce rainhard burn value to something closer to 0 it will basically bring down all values that are above 1 down to “visible” range, without clamping. Remember than even real life cameras usually do some form of tone mapping.
https://www.dabarti.com/screens/s6e0f1517-87fa-4a78-b1dc-2baf7825fcaak.png
https://www.dabarti.com/screens/s65453e3b-b140-4f8c-bd3c-d8906ffac330q.png
what were the RT settings used in the above two reels? what was the PC specs? and how much time did it actually take to render one frame?
For hardware – basically this – https://dabarti.com/vfx/building-4xgpu-rack-mount-rendering-node/ . Render times vary from 2-15 minutes.
Best,
Tomasz